Capturing the Night: A Guide to iPhone Low Light Photography
Related Articles
- AirDrop: The Wireless Wonder For Sharing Files Like A Pro
- Unleash The Power Of Your Voice: A Comprehensive Guide To IOS Voice Control Features
- Unlock A World Of Convenience: Your Comprehensive Apple Pay Setup Guide
- IPhone Vs IPad Comparison
- IPhone 15 Pro Max Vs IPhone 14 Pro Max
Introduction
Uncover the latest details about Capturing the Night: A Guide to iPhone Low Light Photography in this comprehensive overview—perfect for beginners and experts alike!
We’ve got plenty to share about Capturing the Night: A Guide to iPhone Low Light Photography, from its key features to expert advice on how to maximize its potential. Whether you’re just discovering Capturing the Night: A Guide to iPhone Low Light Photography or already a fan, you’ll find something new and exciting in this article. So, let’s jump right in!
Capturing the Night: A Guide to iPhone Low Light Photography
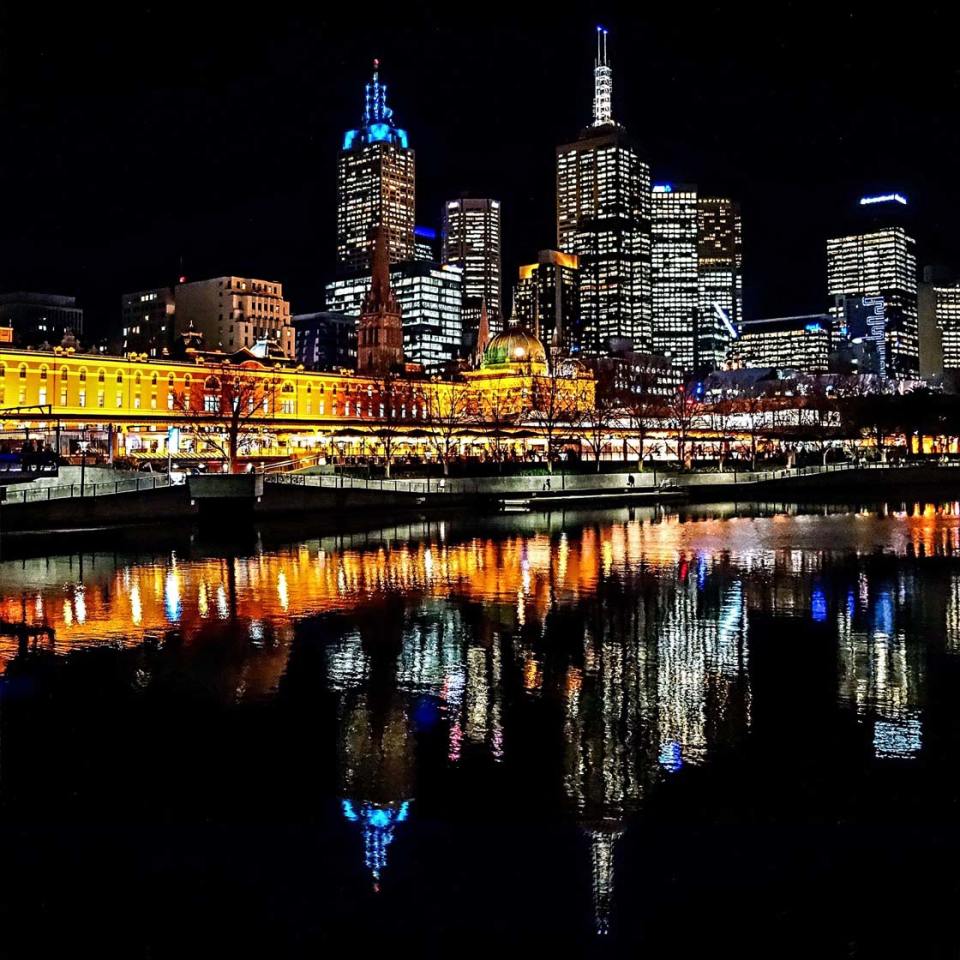
The world transforms at night. Shadows dance, city lights sparkle, and a sense of mystery fills the air. But capturing this magic on your iPhone can be a challenge. Low light conditions present unique obstacles, but with the right techniques and understanding, you can turn your iPhone into a powerful tool for nighttime photography.
Curious about what sets Capturing the Night: A Guide to iPhone Low Light Photography apart? We’ll break down the key highlights you need to know.
Understanding the Challenges of Low Light Photography
Whether you’re a tech enthusiast or just exploring, Capturing the Night: A Guide to iPhone Low Light Photography offers plenty of features to explore—let’s take a look at them.
Low light photography is all about working with limited light. This means your camera sensor struggles to gather enough information to create a clear, well-exposed image. Here’s a breakdown of the common challenges:
Want to stay updated on the latest improvements to Capturing the Night: A Guide to iPhone Low Light Photography? Here’s what’s new and noteworthy.
- Did you know that Capturing the Night: A Guide to iPhone Low Light Photography is known for [key feature]? Let’s see why this is such a game-changer for [specific user group].
- Noise: This is the grainy appearance that often plagues low-light photos. It’s caused by the camera’s sensor trying to amplify the limited light signal, leading to unwanted artifacts.
- Blur: Shaky hands become a major issue in low light. The longer shutter speed required to capture enough light makes it easier for movement to blur your photos.
- Limited Dynamic Range: The difference between the darkest and brightest areas in a scene is compressed in low light. This makes it difficult to capture detail in both the shadows and highlights.
Many users have been talking about the advantages of Capturing the Night: A Guide to iPhone Low Light Photography, but how does it stack up against competitors? We’ll show you the details.
Capturing the Night: A Guide to iPhone Low Light Photography isn’t just about [main feature]—it also offers [another benefit] that enhances user experience.
If you’re ready to dive into Capturing the Night: A Guide to iPhone Low Light Photography, we’ve got expert tips to help you make the most out of it!
One of the reasons Capturing the Night: A Guide to iPhone Low Light Photography is gaining so much attention is because it [solves a problem/provides value] in a way that’s better than others in the market.
Mastering the Basics: Your iPhone’s Built-in Low Light Tools
No matter if you’re a beginner or a seasoned user, Capturing the Night: A Guide to iPhone Low Light Photography has something valuable to offer everyone.
Fortunately, your iPhone is equipped with a powerful set of tools designed to tackle these challenges:
- Want to learn more about how Capturing the Night: A Guide to iPhone Low Light Photography can enhance your experience? We’ve got some advanced tips and tricks.
- Night Mode: This game-changer automatically extends the shutter speed, capturing more light and reducing noise. It’s activated automatically in low-light conditions, and the duration of the exposure is indicated by a yellow timer on the screen.
- Smart HDR: This feature analyzes the scene and intelligently adjusts the exposure for different areas, preserving detail in both the shadows and highlights.
- Depth Control: This allows you to adjust the depth of field after you take the photo, blurring the background and emphasizing your subject.
- Live Photos: This captures a short video clip along with your photo, allowing you to choose the best moment within the sequence or create a "Live Photo" effect.
With its versatile features, Capturing the Night: A Guide to iPhone Low Light Photography stands out as a top choice for [specific use case], making it a favorite among users.
Whether you’re interested in [specific feature] or simply looking for a well-rounded tool, Capturing the Night: A Guide to iPhone Low Light Photography delivers on multiple fronts.
Interested in learning how to get the most out of Capturing the Night: A Guide to iPhone Low Light Photography? Check out these expert strategies that can improve your experience significantly.
One standout feature of Capturing the Night: A Guide to iPhone Low Light Photography is its ability to [key feature], giving users a unique advantage in [specific scenario].
Ready to take your Capturing the Night: A Guide to iPhone Low Light Photography experience to the next level? Here’s how you can do it with some simple yet effective adjustments.
Unlocking Your iPhone’s Potential: Advanced Low Light Techniques
Many users love Capturing the Night: A Guide to iPhone Low Light Photography because it helps streamline [specific task], and here’s how you can benefit from this too.
Now that you’re familiar with the basics, let’s delve into some advanced techniques to elevate your iPhone low-light photography:
One of the reasons Capturing the Night: A Guide to iPhone Low Light Photography remains so popular is its ease of use combined with its powerful capabilities—perfect for all levels of users.
1. Embrace the Night:
Whether you need help with [specific task] or just want to optimize Capturing the Night: A Guide to iPhone Low Light Photography, we’ve got the insights you need.
- Advanced users, here’s a deep dive into how Capturing the Night: A Guide to iPhone Low Light Photography can be customized to fit your specific needs.
- Find Your Light: Look for natural sources of light like streetlights, neon signs, or moonlight. These can create beautiful highlights and add a sense of atmosphere to your photos.
- Explore the City: Urban environments offer a wealth of low-light subjects – bustling streets, illuminated buildings, and colorful shop windows.
- Embrace the Dark: Don’t shy away from darker scenes. Silhouettes and shadows can create dramatic and captivating images.
Combining [feature A] with [feature B] can unlock even more possibilities—let’s explore how this can benefit you.
Want to know the best way to configure Capturing the Night: A Guide to iPhone Low Light Photography for optimal performance? Here are the top setup tips to get you started.
From quick fixes to advanced configurations, Capturing the Night: A Guide to iPhone Low Light Photography offers a range of options for users looking to maximize their experience.
As technology evolves, so does Capturing the Night: A Guide to iPhone Low Light Photography—we’re here to make sure you stay ahead with the best tips and updates.
2. Composition is Key:
Ready to get started with Capturing the Night: A Guide to iPhone Low Light Photography? We’ve outlined the best steps for you to take to ensure smooth performance.
- Whether it’s productivity, entertainment, or customization, Capturing the Night: A Guide to iPhone Low Light Photography offers features that suit all kinds of users.
- Rule of Thirds: Divide your image into nine equal squares, and place your subject along the lines or at their intersections. This creates a more balanced and visually appealing composition.
- Leading Lines: Use lines in the scene to guide the viewer’s eye towards your subject. This can be anything from a street, a fence, or even a row of trees.
- Negative Space: Surround your subject with empty space to create a sense of calm and focus attention on the main element.
Keep an eye on Capturing the Night: A Guide to iPhone Low Light Photography—its latest updates continue to improve the user experience and offer new ways to get more done.
Curious about how Capturing the Night: A Guide to iPhone Low Light Photography can make your daily tasks easier? Let’s break down its most user-friendly features.
Capturing the Night: A Guide to iPhone Low Light Photography continues to evolve, and we’ll keep you informed on all the latest developments and updates.
3. Harness the Power of Night Mode:
- Experiment with Exposure Time: Night Mode’s automatic exposure time can be adjusted manually by tapping and holding the timer icon. This allows you to control the level of blur and light capture.
- Utilize Night Mode for Motion: The extended exposure time of Night Mode can create beautiful light trails from moving objects like cars or fireworks.
- Combine Night Mode with Other Features: Don’t hesitate to use Smart HDR, Depth Control, and Live Photos in conjunction with Night Mode to enhance your low-light images.
4. Embrace the Third-Party Apps:
- ProCamera: Offers a comprehensive set of manual controls, including RAW capture, focus peaking, and custom white balance.
- Halide: Known for its intuitive interface and advanced features like focus bracketing and long exposure.
- VSCO: Provides a wide range of editing tools and filters specifically designed for low-light photography.
5. Post-Processing for Perfection:
- Brightness and Contrast: Adjust these to enhance the overall light and detail in your photos.
- Highlights and Shadows: Fine-tune these settings to recover detail in the brightest and darkest areas of your image.
- Noise Reduction: Use tools like Lightroom Mobile or Snapseed to minimize noise and create a cleaner final image.
6. Tips for Shooting in Low Light:
- Use a Tripod: Stability is essential for sharp images in low light. A tripod will keep your phone steady, allowing for longer exposures without blur.
- Turn on the Flash (Sparingly): While the iPhone’s flash is powerful, it can create harsh shadows and flatten the scene. Use it sparingly for fill-in light or to highlight a specific subject.
- Focus Manually: In low light, the autofocus system may struggle to find the correct point of focus. Use the manual focus feature to achieve precise focus.
- Explore Different Perspectives: Get down low, look up high, or try shooting from unusual angles to create unique and engaging compositions.
FAQs about iPhone Low Light Photography
Q: How do I avoid blurry photos in low light?
- Use a tripod: This is the most effective way to eliminate camera shake.
- Use Night Mode: This feature automatically extends the exposure time, reducing the need for a long shutter speed.
- Hold your phone steady: If you’re not using a tripod, try to brace your elbows against your body for added stability.
Q: What is the best way to capture city lights at night?
- Use Night Mode: This will capture the details of the city lights without overexposing the scene.
- Experiment with different exposure times: Longer exposures will create streaks of light from moving cars or other sources.
- Use a tripod: This will ensure sharp, well-composed images.
Q: How can I improve the quality of my low-light photos?
- Use Night Mode: This will reduce noise and improve detail in your photos.
- Experiment with post-processing: Use editing apps to adjust brightness, contrast, and noise reduction.
- Shoot in RAW: This will give you more flexibility in post-processing.
Q: What are some good subjects for low-light photography?
- Cityscapes: The lights of a city at night create a beautiful and dramatic scene.
- Silhouettes: The contrast between a subject and the dark background can create powerful images.
- Stars: On a clear night, you can capture stunning photos of the Milky Way or other constellations.
- Fireworks: The long exposure time of Night Mode is perfect for capturing the streaks of light from fireworks.
Conclusion:
Low light photography can be challenging, but it’s also incredibly rewarding. By understanding the challenges and harnessing the power of your iPhone’s features, you can capture the magic of the night and create stunning images that will amaze you and your audience. Remember, practice makes perfect. So grab your iPhone, explore the night, and let your creativity shine!
References:
- Apple Support: iPhone Photography Tips
- PetaPixel: iPhone Low Light Photography Tips
- Digital Photography School: Low Light Photography Tips for iPhone
No matter where you are on your Capturing the Night: A Guide to iPhone Low Light Photography journey, we’re here to provide tips, reviews, and insights to help you get the most out of it.
Closure
We’re thrilled to have shared all these insights about Capturing the Night: A Guide to iPhone Low Light Photography with you, and we hope you now have a better understanding of its capabilities.
Stay tuned for more updates, reviews, and guides as we continue to explore Capturing the Night: A Guide to iPhone Low Light Photography and other trending topics. Don’t forget to check back regularly for the latest information and tips!
We’d love to hear your thoughts—leave your comments below to share your experiences or ask any questions you might have about Capturing the Night: A Guide to iPhone Low Light Photography. Your feedback helps us provide more valuable content!
Be sure to bookmark our site or follow us for the latest updates and news about Capturing the Night: A Guide to iPhone Low Light Photography and other exciting developments in tech. We’re committed to keeping you informed and helping you stay ahead of the curve!
Check back soon for more exciting news and updates on Capturing the Night: A Guide to iPhone Low Light Photography!