iPhone Troubleshooting: Your Guide to Solving Common Issues
Related Articles
- Your IPhone: A Pocket-Sized Health Companion
- Unlocking The Magic Of IOS: A Beginner’s Guide To Apple’s Mobile Ecosystem
- Unlocking Your IPhone’s Productivity Potential: A Guide To Everyday Hacks
- Your IPhone’s Secret Weapon: The Best Note-Taking Apps For Every Need
- Zooming In On The IPhone Camera: A Deep Dive Into Its Capabilities
Introduction
Discover everything you need to know about iPhone Troubleshooting: Your Guide to Solving Common Issues, including exciting updates and tips.
We’ve got plenty to share about iPhone Troubleshooting: Your Guide to Solving Common Issues, from its key features to expert advice on how to maximize its potential. Whether you’re just discovering iPhone Troubleshooting: Your Guide to Solving Common Issues or already a fan, you’ll find something new and exciting in this article. So, let’s jump right in!
iPhone Troubleshooting: Your Guide to Solving Common Issues
Ah, the iPhone. A sleek, powerful device that seamlessly integrates into our lives. But even the best technology can experience hiccups. From a frozen screen to a stubborn battery, we’ve all encountered those frustrating moments. Fear not, fellow iPhone users! This comprehensive guide will equip you with the knowledge and tools to troubleshoot common iPhone problems like a pro.
Curious about what sets iPhone Troubleshooting: Your Guide to Solving Common Issues apart? We’ll break down the key highlights you need to know.
1. The Basics: Restarting Your iPhone
Whether you’re a tech enthusiast or just exploring, iPhone Troubleshooting: Your Guide to Solving Common Issues offers plenty of features to explore—let’s take a look at them.
Before diving into complex solutions, always start with the simplest: a restart. It’s the equivalent of a digital deep breath, clearing out temporary glitches and refreshing your iPhone. Here’s how:
Want to stay updated on the latest improvements to iPhone Troubleshooting: Your Guide to Solving Common Issues? Here’s what’s new and noteworthy.
- Did you know that iPhone Troubleshooting: Your Guide to Solving Common Issues is known for [key feature]? Let’s see why this is such a game-changer for [specific user group].
- For iPhone 8 and later: Press and quickly release the volume up button, then press and quickly release the volume down button. Finally, press and hold the side button until the Apple logo appears.
- For iPhone 7 and 7 Plus: Press and hold both the sleep/wake and volume down buttons simultaneously until the Apple logo appears.
- For iPhone 6s and earlier: Press and hold the sleep/wake button until the "slide to power off" slider appears. Drag the slider to power off your phone, then press and hold the sleep/wake button again to turn it back on.
Many users have been talking about the advantages of iPhone Troubleshooting: Your Guide to Solving Common Issues, but how does it stack up against competitors? We’ll show you the details.
iPhone Troubleshooting: Your Guide to Solving Common Issues isn’t just about [main feature]—it also offers [another benefit] that enhances user experience.
If you’re ready to dive into iPhone Troubleshooting: Your Guide to Solving Common Issues, we’ve got expert tips to help you make the most out of it!
One of the reasons iPhone Troubleshooting: Your Guide to Solving Common Issues is gaining so much attention is because it [solves a problem/provides value] in a way that’s better than others in the market.
2. When Your iPhone is Frozen or Unresponsive
No matter if you’re a beginner or a seasoned user, iPhone Troubleshooting: Your Guide to Solving Common Issues has something valuable to offer everyone.
A frozen iPhone can be a real pain, especially when you need it most. Here’s how to deal with this:

- Want to learn more about how iPhone Troubleshooting: Your Guide to Solving Common Issues can enhance your experience? We’ve got some advanced tips and tricks.
- With its versatile features, iPhone Troubleshooting: Your Guide to Solving Common Issues stands out as a top choice for [specific use case], making it a favorite among users.
Force restart: This is a more aggressive reboot that can fix most frozen screens.
Whether you’re interested in [specific feature] or simply looking for a well-rounded tool, iPhone Troubleshooting: Your Guide to Solving Common Issues delivers on multiple fronts.
- Interested in learning how to get the most out of iPhone Troubleshooting: Your Guide to Solving Common Issues? Check out these expert strategies that can improve your experience significantly.
- For iPhone 8 and later: Press and quickly release the volume up button, then press and quickly release the volume down button. Finally, press and hold the side button until the Apple logo appears.
- For iPhone 7 and 7 Plus: Press and hold both the sleep/wake and volume down buttons simultaneously until the Apple logo appears.
- For iPhone 6s and earlier: Press and hold both the sleep/wake and home buttons simultaneously until the Apple logo appears.
One standout feature of iPhone Troubleshooting: Your Guide to Solving Common Issues is its ability to [key feature], giving users a unique advantage in [specific scenario].
Ready to take your iPhone Troubleshooting: Your Guide to Solving Common Issues experience to the next level? Here’s how you can do it with some simple yet effective adjustments.
Many users love iPhone Troubleshooting: Your Guide to Solving Common Issues because it helps streamline [specific task], and here’s how you can benefit from this too.
One of the reasons iPhone Troubleshooting: Your Guide to Solving Common Issues remains so popular is its ease of use combined with its powerful capabilities—perfect for all levels of users.
- Advanced users, here’s a deep dive into how iPhone Troubleshooting: Your Guide to Solving Common Issues can be customized to fit your specific needs.
Check for external interference: Sometimes, external factors like a faulty charger or a case that interferes with the buttons can cause freezing. Try removing any external accessories and see if that resolves the issue.
Combining [feature A] with [feature B] can unlock even more possibilities—let’s explore how this can benefit you.
Whether you need help with [specific task] or just want to optimize iPhone Troubleshooting: Your Guide to Solving Common Issues, we’ve got the insights you need.
Want to know the best way to configure iPhone Troubleshooting: Your Guide to Solving Common Issues for optimal performance? Here are the top setup tips to get you started.
From quick fixes to advanced configurations, iPhone Troubleshooting: Your Guide to Solving Common Issues offers a range of options for users looking to maximize their experience.
3. Battery Troubles: When Your iPhone Dies Too Quickly
As technology evolves, so does iPhone Troubleshooting: Your Guide to Solving Common Issues—we’re here to make sure you stay ahead with the best tips and updates.
A dwindling battery can be a major inconvenience. Here’s how to tackle those battery woes:
Ready to get started with iPhone Troubleshooting: Your Guide to Solving Common Issues? We’ve outlined the best steps for you to take to ensure smooth performance.
- Whether it’s productivity, entertainment, or customization, iPhone Troubleshooting: Your Guide to Solving Common Issues offers features that suit all kinds of users.
- Check your battery usage: Go to Settings > Battery to see which apps are draining your battery the most. Close or limit the use of apps that are consuming excessive power.
- Reduce screen brightness: A brighter screen uses more battery. Dim the brightness in Settings > Display & Brightness.
- Turn off background app refresh: This setting allows apps to update in the background, which can drain your battery. Go to Settings > General > Background App Refresh and disable it or choose specific apps to allow background refresh.
- Enable Low Power Mode: This setting extends your battery life by temporarily reducing certain features. Go to Settings > Battery and toggle on Low Power Mode.
- Check for faulty apps: Sometimes, a rogue app can drain your battery faster than usual. Try deleting apps you suspect are causing the problem and see if your battery life improves.
Keep an eye on iPhone Troubleshooting: Your Guide to Solving Common Issues—its latest updates continue to improve the user experience and offer new ways to get more done.
Curious about how iPhone Troubleshooting: Your Guide to Solving Common Issues can make your daily tasks easier? Let’s break down its most user-friendly features.
iPhone Troubleshooting: Your Guide to Solving Common Issues continues to evolve, and we’ll keep you informed on all the latest developments and updates.
4. Wi-Fi Woes: When Your iPhone Can’t Connect
A spotty Wi-Fi connection can be frustrating. Here’s how to get back online:
- Restart your router: This simple step often fixes connectivity issues. Unplug your router, wait for 30 seconds, and plug it back in.
- Forget and re-join your Wi-Fi network: Go to Settings > Wi-Fi, tap the "i" icon next to your network, and tap Forget This Network. Then, rejoin your network and enter the password.
- Check your Wi-Fi settings: Make sure your iPhone is set to automatically join your network. Go to Settings > Wi-Fi and ensure Ask to Join Networks is turned off.
- Reset network settings: This will erase all your Wi-Fi and Bluetooth settings, so make sure to have your passwords handy. Go to Settings > General > Transfer or Reset iPhone > Reset Network Settings.
5. Bluetooth Blues: When Your iPhone Won’t Pair
Bluetooth connectivity issues can be a real headache, especially when trying to connect your headphones or car. Here’s how to troubleshoot:
- Restart your Bluetooth device: Turn off your headphones or other Bluetooth device, wait a few seconds, and turn it back on.
- Forget and re-pair your device: Go to Settings > Bluetooth, tap the "i" icon next to your device, and tap Forget This Device. Then, try pairing again.
- Check for interference: Bluetooth signals can be affected by other wireless devices. Try moving your iPhone and Bluetooth device closer together or away from other sources of interference.
- Reset network settings: As mentioned earlier, resetting network settings can also fix Bluetooth connectivity issues.
6. Storage Space Struggles: When Your iPhone is Full
A full storage space can lead to sluggish performance and app crashes. Here’s how to free up space:
- Delete unnecessary apps: Go to Settings > General > iPhone Storage and identify apps you don’t use regularly. Tap on an app and choose Delete App.
- Offload unused apps: This option keeps the app’s data on your iPhone but removes the app itself, freeing up storage space. To offload an app, go to Settings > General > iPhone Storage and tap Offload App.
- Delete photos and videos: If you have a lot of photos and videos taking up space, consider moving them to a cloud storage service like iCloud, Google Photos, or Dropbox.
- Clear your cache: Some apps store temporary data in their cache, which can take up space. To clear the cache, go to Settings > General > iPhone Storage and tap on an app to see if it has a "Clear Cache" option.
7. App Issues: When Your iPhone Apps Are Misbehaving
Apps can sometimes crash, freeze, or behave unexpectedly. Here’s how to deal with app problems:
- Force quit the app: Double-click the home button (or swipe up from the bottom of the screen) to bring up the app switcher. Swipe up on the app’s preview to close it.
- Update the app: Go to the App Store and check for updates. If an update is available, download and install it.
- Reinstall the app: If updating the app doesn’t solve the problem, try reinstalling it. Delete the app and then download it again from the App Store.
- Check for app compatibility: Some apps may not be compatible with your iPhone’s operating system. Check the App Store listing to see if the app is compatible with your device.
8. Sound Problems: When Your iPhone’s Audio Is Acting Up
Whether it’s muffled sound, no sound at all, or a crackling speaker, audio issues can be frustrating. Here’s how to fix them:
- Clean your speakers: Dust and debris can accumulate in your iPhone’s speakers, affecting sound quality. Use a soft-bristled brush or a compressed air can to clean them.
- Check your volume settings: Make sure your iPhone’s volume is turned up and that the mute switch is not engaged.
- Restart your iPhone: A simple restart can often resolve sound issues.
- Check for software updates: Outdated software can sometimes cause audio problems. Check for updates in Settings > General > Software Update.
9. Camera Troubles: When Your iPhone’s Camera Doesn’t Work
A malfunctioning camera can be a major bummer, especially when you want to capture those precious moments. Here’s how to troubleshoot:
- Clean the camera lens: Dust and smudges can affect image quality. Use a soft cloth or a microfiber lens cleaning cloth to clean the lens.
- Restart your iPhone: A simple restart can often fix camera issues.
- Check for software updates: Outdated software can sometimes cause camera problems. Check for updates in Settings > General > Software Update.
- Disable and re-enable the camera: Go to Settings > Privacy > Camera and turn off the camera access for all apps. Then, turn it back on.
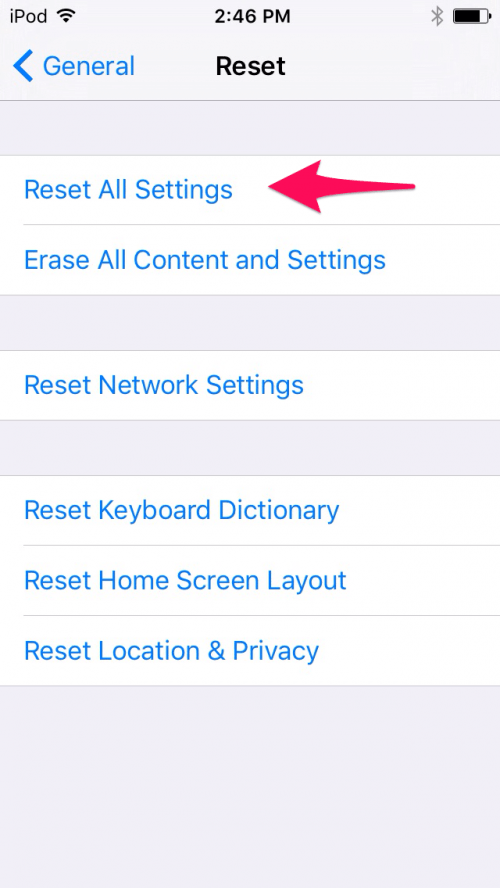
- Reset all settings: If none of the above solutions work, try resetting all settings to their defaults. This will erase all your personalized settings, so make sure to back up your data first. Go to Settings > General > Transfer or Reset iPhone > Reset All Settings.
10. iCloud Issues: When Your iPhone Can’t Sync with iCloud
iCloud is a powerful tool for syncing data across your Apple devices. However, it can sometimes experience hiccups. Here’s how to troubleshoot iCloud problems:
- Check your internet connection: iCloud requires a stable internet connection to sync data. Make sure your iPhone is connected to Wi-Fi or has a strong cellular signal.
- Sign out and sign back in to iCloud: Go to Settings > [Your Name] > Sign Out. Then, sign back in using your Apple ID and password.
- Disable and re-enable iCloud: Go to Settings > [Your Name] > iCloud and turn off the iCloud sync for all data types. Then, turn them back on.
- Reset network settings: Resetting network settings can also resolve iCloud issues.
- Contact Apple Support: If you’re still experiencing iCloud problems, contact Apple Support for assistance.
11. Touchscreen Troubles: When Your iPhone’s Touchscreen Isn’t Responsive
A non-responsive touchscreen can be a frustrating experience. Here’s how to tackle this issue:
- Clean the screen: Smudges and fingerprints can interfere with the touchscreen’s responsiveness. Use a soft, microfiber cloth to clean the screen.
- Restart your iPhone: A simple restart can often fix touchscreen problems.
- Check for software updates: Outdated software can sometimes cause touchscreen issues. Check for updates in Settings > General > Software Update.
- Check for physical damage: Inspect your iPhone’s screen for any cracks or scratches. If you notice any damage, you may need to have the screen repaired.
- Contact Apple Support: If none of the above solutions work, contact Apple Support for assistance.
12. Data Connection Problems: When Your iPhone Can’t Connect to Cellular Data
A lack of cellular data can leave you stranded without internet access. Here’s how to fix this:
- Check your cellular data settings: Go to Settings > Cellular and ensure that Cellular Data is turned on.
- Restart your iPhone: A simple restart can often fix data connection issues.
- Check your carrier’s network status: Contact your carrier to see if there are any network outages in your area.
- Reset network settings: Resetting network settings can also resolve data connection issues.
- Contact your carrier: If none of the above solutions work, contact your carrier for assistance.
13. Overheating Issues: When Your iPhone Gets Too Hot
An overheating iPhone can be a sign of a problem. Here’s how to cool it down:
- Close apps: Running multiple apps simultaneously can generate heat. Close any apps you’re not using.
- Turn off location services: Location services can drain your battery and generate heat. Go to Settings > Privacy > Location Services and disable it for apps that don’t need it.
- Reduce screen brightness: A brighter screen generates more heat. Dim the brightness in Settings > Display & Brightness.
- Remove your iPhone from direct sunlight: Prolonged exposure to direct sunlight can cause your iPhone to overheat.
- Avoid using your iPhone while charging: Charging your iPhone while using it can generate excessive heat.
14. General Performance Issues: When Your iPhone Is Running Slow
A sluggish iPhone can be frustrating. Here’s how to speed it up:
- Close apps: Running multiple apps simultaneously can slow down your iPhone. Close any apps you’re not using.
- Check for software updates: Outdated software can sometimes cause performance issues. Check for updates in Settings > General > Software Update.
- Clear your cache: Some apps store temporary data in their cache, which can slow down your iPhone. To clear the cache, go to Settings > General > iPhone Storage and tap on an app to see if it has a "Clear Cache" option.
- Delete unnecessary files: Go to Settings > General > iPhone Storage and identify files you don’t need. Delete them to free up storage space.
- Reset all settings: If none of the above solutions work, try resetting all settings to their defaults. This will erase all your personalized settings, so make sure to back up your data first. Go to Settings > General > Transfer or Reset iPhone > Reset All Settings.
FAQ (Frequently Asked Questions)
Q: What should I do if my iPhone won’t turn on?
A: If your iPhone won’t turn on, try plugging it into a power source and see if it charges. If it doesn’t, the battery may be completely drained, or there could be a hardware issue. You can try a force restart (refer to the section on frozen iPhones) or contact Apple Support for assistance.
Q: How do I restore my iPhone to factory settings?
A: To restore your iPhone to factory settings, go to Settings > General > Transfer or Reset iPhone > Erase All Content and Settings. This will erase all data and settings from your iPhone, so make sure to back up your data first.
Q: What should I do if my iPhone is water damaged?
A: If your iPhone has been exposed to water, immediately remove it from the water and dry it with a soft cloth. Avoid using a hairdryer or any other heat source to dry it. Do not attempt to turn it on. Contact Apple Support for assistance.
Q: How do I update my iPhone’s operating system?
A: To update your iPhone’s operating system, go to Settings > General > Software Update. If an update is available, download and install it.
Q: What should I do if my iPhone is lost or stolen?
A: If your iPhone is lost or stolen, you can use the "Find My iPhone" app or website to locate it, lock it, or erase its data. You can also contact your carrier to report the device as lost or stolen.
Q: How do I back up my iPhone?
A: You can back up your iPhone to iCloud or to your computer using iTunes. To back up to iCloud, go to Settings > [Your Name] > iCloud > iCloud Backup and turn on iCloud Backup. To back up to iTunes, connect your iPhone to your computer and open iTunes. Select your iPhone in the iTunes window and click Back Up Now.
Conclusion
Navigating iPhone troubleshooting can feel daunting, but with this guide, you’re equipped to tackle common issues with confidence. Remember to start with the basics, like restarting your phone, and work your way up to more advanced solutions. If you encounter persistent problems, don’t hesitate to contact Apple Support for expert assistance. With a little patience and these tips, you’ll be back to enjoying your iPhone in no time!
Source URLs:
- Apple Support: https://support.apple.com/
- Find My iPhone: https://www.icloud.com/find
- App Store: https://apps.apple.com/
No matter where you are on your iPhone Troubleshooting: Your Guide to Solving Common Issues journey, we’re here to provide tips, reviews, and insights to help you get the most out of it.
Closure
Thank you for joining us as we explored iPhone Troubleshooting: Your Guide to Solving Common Issues—we hope you’ve discovered something new and exciting.
Stay tuned for more updates, reviews, and guides as we continue to explore iPhone Troubleshooting: Your Guide to Solving Common Issues and other trending topics. Don’t forget to check back regularly for the latest information and tips!
We’d love to hear your thoughts—leave your comments below to share your experiences or ask any questions you might have about iPhone Troubleshooting: Your Guide to Solving Common Issues. Your feedback helps us provide more valuable content!
Be sure to bookmark our site or follow us for the latest updates and news about iPhone Troubleshooting: Your Guide to Solving Common Issues and other exciting developments in tech. We’re committed to keeping you informed and helping you stay ahead of the curve!
Keep visiting for more tips and in-depth reviews on iPhone Troubleshooting: Your Guide to Solving Common Issues and similar products!